HTML Import Test

Architecture

Top  Previous  Next

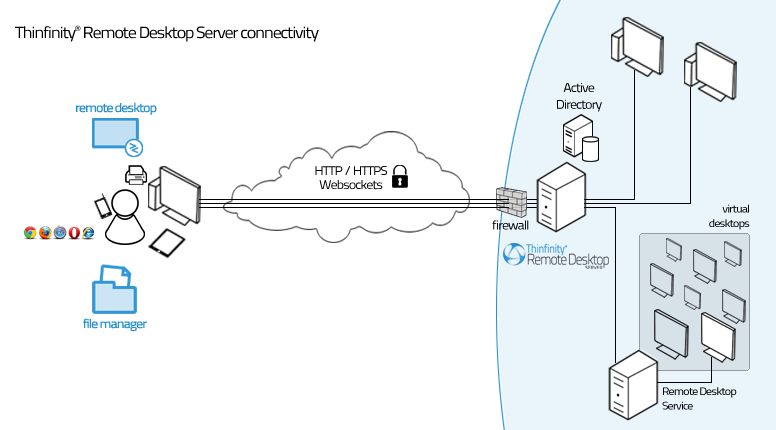
Thinfinity® Remote Desktop Server is composed of:

a Server Machine running Thinfinity® Remote Desktop Server
Thinfinity® Remote Desktop Web Client (which loads on an HTML5 browser)

Thinfinity® Remote Desktop Server is a secure, high-performance HTTP / WebSockets server, which serves the web pages needed to run the Thinfinity® Remote Desktop Web Client on the web browser.

When the end-user accesses the Thinfinity® Remote Desktop main page and enters the appropriate connection parameters, the Thinfinity® Remote Desktop Web Client communicates with the server, using Ajax and WebSockets (if available) to start the connection to the remote-end.

Once the connection is established, the server will receive RDP commands, optimize them for the web, and send the resulting data stream to the Thinfinity® Remote Desktop Web Client.

Thinfinity_Remote_Desktop_Server_Architecture

Load Balancing Architectures for Thinfinity® Remote Desktop Server:

Thinfinity® Remote Desktop Server can be configured in two different load balancing architectures:

Thinfinity® Remote Desktop Server Load Balancer
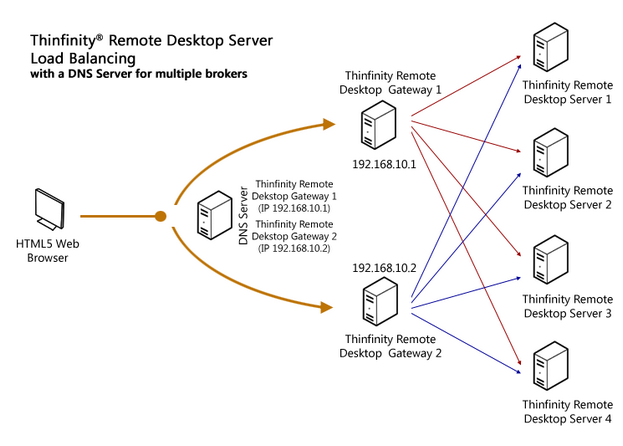
Thinfinity® Remote Desktop Server Load Balancer with a DNS for multiple brokers

Thinfinity_Remote_Desktop_LoadBalancingDNS

Read more about load balancing.

Requirements:

Using Thinfinity® Remote Desktop Server, any Windows, Mac OS X, Linux, Android and iOS user can remote into a Windows desktop or work with a single Windows application.

Web Client

OS independent
HTML5-compliant Web Browser

– Internet Explorer 9.0, 10.0, 11.0

– Firefox 17+

– Chrome 22+

– Safari 6.0.1+

– iOS 5.1.1+

– Android 2.3, 4.0+

– Edge 38+

Server Machine

Windows XP 32 and 64 bit
Windows Vista 32 and 64 bit
Windows 7 32 and 64 bit
Windows 8 32 and 64 bit
Windows 10 32 and 64 bit
Windows Server 2003 32 and 64 bit
Windows Server 2008 32 and 64 bit
Windows Server 2012 and 2012 R2
Windows Server 2016

This help system was created with an evaluation copy of Help & Manual.

Note Taking

Whether it's at the office during an important client conference call, at home or in the supermarket, we have to jot down different types of notes and information on a routine basis. From someone's contact number to a snippet of a technical article for a work project, it could be anything. Sometimes the information to be noted down isn't even textual, but visual (e.g. a photo of an advertising flyer of interest).

This is where note-taking apps come into play. These handy apps let you keep note of everything from texts to voice memos, all with your smartphone. But with hundreds of note-taking apps available, it can be difficult to pick the right one.

Features of a Good Note Taking app

Here is a list of features to look for when checking out note taking apps:

  • A good note-taking app should be fast and easy to navigate.
  • It should sync your notes across multiple devices quickly and accurately.
  • It should be available no matter what computing platform you use now or might switch to in the future.
  • It should have lightning-fast search across all of your notes.
  • It shouldn’t be bogged down with too many confusing features — but it also can’t be so bare-bones that it won’t meet your needs.
  • It should protect the security and privacy of your notes.
  • It should also be inexpensive with low monthly fee, or even free.

Note Taking Apps

Evernote
With its ability to capture a wide range of digital information and exceptional organizational features, Evernote is unquestionably the best note-taking app out there.

Evernote lets you take notes in a variety of formats, including text, pictures, audio and video recordings, annotated Web page clippings and more. These notes can be organized into virtual notebooks and managed using tools such as tags and shortcuts. Evernote's Web clipper browser extension lets you save Web pages with one click and annotate them with highlights and visual callouts. Using your smartphone's camera, the app can scan and digitize everything from documents to business cards in a snap.

Evernote has a long list of features, but many of the more advanced features—particularly the features that are useful to businesses—are locked behind one of two subscription tiers, one designed for individual use and the other for the enterprise.

Evernote is available on Windows, macOS, iOS, and Android. It stores notes, lists, and other work in the cloud, giving you access to all of them no matter what kind of computer you're using—you can even access Evernote via an internet browser on systems that don't have the app installed.

OneNote
Microsoft's productivity solutions are highly regarded as the best in the business, and OneNote is no exception. Being a free-form information gathering app, OneNote lets you capture just about everything and place it anywhere on a flexible digital canvas. You can type, write by hand (using a stylus), clip Web pages and even scan handwritten notes or pages.

The app uses virtual notebooks for organizing content and has a design similar to a physical three-ring binder. You can have separate color-coded sections for adding different types of notes, and each section can have multiple pages.

Since it's a part of Microsoft's Office suite, OneNote works well with applications such as Word, Excel and PowerPoint. The app is available across all major platforms such as iOS and Android.

iOS: Apple Notes
If you use an iPhone and/or an iPad, you don't even need to look for a third-party app. Apple's own Notes app, which comes included into iOS, is more than enough for all your note-taking needs. From long-form textual notes to to-do lists, Apple Notes lets you jot down everything. You can also add Web links, scanned documents and sketches to notes. Like Android OS, you can also use a virtual digital assistant, named Siri, to create a new note and dictate its content. The app's camera functionality makes it easy to quickly add photos to notes, and you can also scan paper documents to digitize them into notes.

Android: Google Keep App
Google Keep is one of best first-party note-taking app for Android from Google, the company that developed Android OS. From textual information to photos, Google Keep makes it easy to jot down anything. You can even record a voice memo on the go, and the app will transcribe it automatically. The notes are organized as digital sticky notes, and each note can be assigned a different color for easier visual identification. You can add individual reminders to each note, plus information such as date, time and place when you want to be reminded.

Activity - Clip a Job Advert for your Ideal Job from a Recruitment Website

  1. Download and install Evernote using the following link :-

https://evernote.com/download/

  1. Signup for a free Evernote account.
  2. Create the following Notebook structure within Evernote for storing clipped job adverts and other job-related items.

Job Search
01 – Jobs to Consider
05 – Jobs to Aim For in the Future
10 – Jobs to Apply For Now
15 – Job Apps Submitted
Job Advice
Job Cover Letters
Job News

  1. Start the Firefox or Chrome browser and install the Evernote Web Clipper Add-on.
  2. Open the website www.irishjobs.ie and search for a job which interests you.
  3. Clip a job that meets your requirements into the appropriate notebook above depending on how you would classify it.

--- End of Activity ---

Related Tutorials

Home Backup Solution

Importance of backing up Your data

It cannot be stressed enough to a computer user the importance of making backup copies of data files held on a home computer. In the event of computer hard drive failure, computer virus, software program error or theft of your computer, it is always essential to keep backup copies of your data.

After many years of using your computer in the home, your data held on the computer becomes more valuable than the computer itself. This is because the computer is replaceable while the data in most cases can be hard to replace because producing documents, spreadsheets and databases is a time-consuming process which involves many hours of hard graft and creativity.

Backing-up data is considered to be a boring task by most users so it is usually forgotten about. It is only when it is too late is it realised how important it is and by then it can be almost impossible to retrieve data that has become lost due to reasons mentioned above.

So in future, remember to always take a backup of an important file immediately after creating the first proper version of it. These days this can be easily achieved by using an online backup facility or scheduling a backup to a portable or network drive which are relatively inexpensive and easily installed.

In the rest of this Document, I explain in more detail the basic steps to backup your valuable data so that you can get peace of mind that in the event of a disaster that your data is protected and can be quickly restored and made available for immediate use.

You will no longer have sleepless nights worrying about your home being burgled and your computer stolen as you will have a recent backup of your data kept in a safe location.

Backup process

Step 1 - Identifying data to backup

Identifying and ensuring that the data backed-up is not an easy task especially if you are a keen computer user who creates and updates files on a regular basis. It is essential to keep your data well organised so that you can be sure that the files you backup represent the complete picture. So if you need to recover all your data due to hard disk failure or a stolen computer, you will have confidence that you can recover all your data files.

It’s not always easy to keep files organised, as even though you may have a very systematic approach to storing your data in the appropriate folders, some programs may store important data files outside of Windows Standard folders. So this makes it difficult to be always fully sure that all required files have been backed up.

Figure 1 – Windows 10 Standard folders

It is probably NOT a good idea to use Windows Standard folders for important files, because if you have to reset Windows 10, there is a risk that the files could be deleted even though you specify that they should be kept.

Taking full backups of all your data in one single backup is to be avoided as it is hard to manage and restore from. So, another approach is to categorise your data into the following Backup Types:

Primary Data can be defined as the key data like financial info, career development documents e.g CV and cover letters, family health documents, genealogy database etc. Primary Data should be held in Cloud storage local folders like Google Drive or Onedrive, so that in the event of hard-disk failure, the most up-to-date version would be safe. It should also be password protected as it would contain sensitive information.

Secondary Data can be defined as data that is of less importance than Primary Data but is still essential to be secured in the event of potential data loss. This might include Photos, Home Videos and Video Courses.

Recreatable Data can be defined as data that is recreatable easily or can be downloaded again, e.g Music, YouTube videos, Movies, Magazines etc

It is usually better to create backups by grouping the data to be backed up in a systematic way, so that in the event of having to restore files onto a new computer, the contents of each backup file can easily be identified. So rather than running one backup on a regular basis, it is usually better to group specific data files depending on category of data or project you are working on.

So for example, if you were a keen Photographer who goes out on many field trips, the standard windows folder for storing photographs, i.e Pictures, may be inadequate. So you might need a hierarchy of folders to be created to store the different file types for each location/event covered.

Or in the case of storing Home Admin files, you would have to create additional folders within your main folder e.g Finance, Medical, Children’s Education, Holidays etc.

Home User Data Types

Below is a list of the different types of data that a typical home user would build-up and would need to be backed up regularly.

  • Documents
    • Letters
    • Reports
    • Spreadsheets
    • Mailing lists
  • Email
  • Financial Records
    • Tax Returns
    • Banking records
    • Investment records
  • Photos
  • Music
  • Movies/Videos
  • Contacts inc. email address and phone numbers
  • Saved games
  • Computer and program settings

Step 2 – Produce a Backup Plan

A backup plan is essential if you want to get to point where you are sure you have backed-up all important data to protect you against data loss either due to your own actions e.g. deleting a file by mistake, accidental damage e.g. dropping your laptop, or malicious means e.g. virus attack or theft.

Depending on the importance of your data and the type of user you are, it can help to think in terms of Protection Levels. You can select the level of cover you need to protect you from loss of data and give you peace of mind that you can be up and running again within an hour or so of mishap occurring.

Protection Levels - Basic Cover, Mid-Range Cover or Full Cover – Select based on the importance of your data to you/family/home and type of user you are. So ask yourself - what would be the impact of loss of home user data listed above?

Basic Cover – Store Primary Data in cloud storage like Google Drive, Microsoft Onedrive, or Google Drive, Backup to portable drive and store in car boot, family members house or bank deposit box.

Mid-Range Cover – On top of Basic cover – Set-up automatic backup using simple folder sync software of cloud storage local folders to another cloud storage service or online backup service. Cloud storage like those mentioned above include versioning, so it is possible to restore earlier versions of files if the local file on PC becomes corrupt.

Full-Cover – On top of Mid-Range cover – Set-up full/differential scheduled backup of all data to a NAS Drive. This would work particularly well where there is multiple PC’s in a home and you want to backup automatically on a regular basis.

Definition: NAS Drive - Network-attached storage (NAS) is a type of dedicated file storage device that provides home network PCs with file-based shared storage.

Different types of data obviously have different values. As a rough guide, work out the replacement cost of your files and how much you would pay to replace them. For example, the audio files you ripped from your CDs are not worth much - you could rip them again, or buy digital tracks on iTunes. Your unfinished PhD thesis, blockbuster novel or genealogy database would be worth much more because of the time and effort it would take to recreate it from scratch.

Backup Plan Sample – Full Cover

Folder to Backup Google Drive – 100 GB Onedrive - 1 TB Portable Drive or NAS Drive Backup Type (as above) Frequency
Primary Data Backup Yes Yes Yes Primary Daily
Computer Support Folder Yes Yes Yes Primary Daily
Email exported from Outlook, Gmail or Thunderbird etc Yes Yes Yes Primary Daily
Windows Standard Folders –Documents, Desktop etc Yes Yes Yes Primary Daily
ebook library – Primary Yes Yes Yes Secondary Weekly
Home Movies Yes Yes Yes Secondary Weekly
My Pictures Yes Yes Yes Secondary Weekly
Video for Studies – Recorded Courses, Youtube tutorials Yes Yes Yes Secondary Weekly
Website Backups Yes Yes Yes Secondary Weekly
Music – synchronised with all computers in house No Yes Yes Recreatable Monthly
Saved Games No Yes Yes Recreatable Monthly
Videos for Leisure - Youtube Concerts, Photography No Yes Yes Recreatable Monthly

Step 3 – Carry out Pre-backup of Key Programs

The purpose of the pre-backup step is to export data, from programs or web apps that you use, into data files that can be backed-up. There is no guarantee that these web-based apps you depend on will keep your data safe and they also could be targeted by hackers who might corrupt your data.

First of all, create a Computer Support folder in cloud storage, e.g Google Drive or Onedrive, into which you will create sub-folders to backup key applications that contain important data as listed below.

  1. Archive GMail using Upsafe Gmail Backup or GMVault and save in sub-folder Gmail Backup
  2. Export Evernote notebooks and save in sub-folder Evernote Backup
  3. Export Google Calendar to sub-folder Google Calendar Backup
  4. Archive Facebook Profile, Posts, Photos and save in sub-folder Facebook Archive

Once the pre-backup data has been saved to Computer Support folder the next step is to backup your data using your chosen backup software.

Step 4 – Run main Backup Jobs

There are many backup programs available on the Internet which are reviewed and compared in some detail e.g PC Advisor - Best Backup Software 2018

A good approach is to select 3 programs from a list like one above and download and install trial versions. Then put each one through a backup test so that you can assess its suitability for use as your main backup program.

The first Backup step is to set-up a schedule (default Daily) for the main backup program to backup folders you have marked as Primary Data (as shown in column ‘Backup Type’ in Backup Plan above).

The next step is to set-up a schedule (default Weekly) for the backup of Secondary Data (as shown in column ‘Backup Type’ in Backup Plan above) using main backup program.

Finally, set-up a schedule (default Monthly) for the backup of Recreatable Data using the main backup program.

Step 5 - Test Restore from Backups

It’s all very well carrying out backups regularly, but it is also important, especially after setting-up a new backup job, to test the restore of your data.

So using your main backup program, restore a key folder within your Primary Data e.g Finance, Career Development to a test folder e.g Backup Test Restore - Finance

When the restore is complete check the restore log file to make sure it finished successfully. It may also be necessary to run a comparison of the test restore folder with the actual folder and make sure there are no differences.

As a final test, check that you can access the data by opening a document or spreadsheet in the test restore folder which will give you confidence that data is usable.

Disaster Recovery

Test full set-up of a Backup PC using portable drive containing Primary and Secondary data backups only.

The objective is to make sure that PC is fully operational to carry out your home/office tasks as if you were on your main PC.
Related Tutorials

Produce Expenses Chart in Acemoney Lite Software

This report shows how much money you have spent by subcategory. Report rows represent a subcategory with a total amount. If you double click at the report line, AceMoney shows a list of transactions for the selected subcategory.
The first two steps take you through the download of transactions from your bank and import into Ace Money Lite. The succeeding steps, take you through the categorising of transactions and creation of Sub-categories Report and Chart.

Photo Editing Demo – House

This demo covers the necessary steps to enhance a photo using the 10 Step Post Processing Workflow as outlined by www.cambridgeincolour.com.  You may not need to follow this procedure with all of your photos, but whenever you want to get that special photo looking just right, these steps can make all the difference.

Evaluating Photo

Before you carry out any editing, you have to first of all evaluate the photo to decide which steps you might need to apply.  The display on the camera is so small, captured photos are hard to evaluate properly.  So what do you look for when deciding if one of your photos can be improved?

The main areas to look at are :-

  1. The Tonal Range - range of tones in a photo between pure white and pure black.
  2. Colours - hue, saturation, and brightness can be adjusted.
  3. Flaws in Photo – Small imperfections can be retouched using Photo Editing Program.
  4. Sharpness of Photo – most photos can benefit from sharpening.
  5. Noise – can appear in low light conditions when using high ISO setting.

After evaluating a photo, you should then decide which steps of the Post Processing Workflow should be carried out as shown below.

10 Step Post Processing Workflow Photo of Bedroom
  1. White Balance - temperature and tint adjustment sliders
  1. Exposure - exposure compensation, highlight/shadow recovery
  1. Noise Reduction - during RAW development or using external software
  1. Lens Corrections - distortion, vignetting, chromatic aberrations
  1. Detail - capture sharpening and local contrast enhancement
  1. Contrast - black point, levels and curves tools
  1. Framing - straighten and crop
  1. Refinements - colour adjustments and selective enhancements
  1. Resizing - enlarge for a print or downsize for the web or email
  1. Output Sharpening - customized for your subject matter and print/screen size

Read more at...
http://www.cambridgeincolour.com/tutorials/digital-photo-editing-workflow.htm

Step 2 – Exposure

The camera settings for this photo are:

Program mode: Aperture priority
Exposure time: 1/250s
Aperture: F10
ISO: 250
Exposure bias: -1

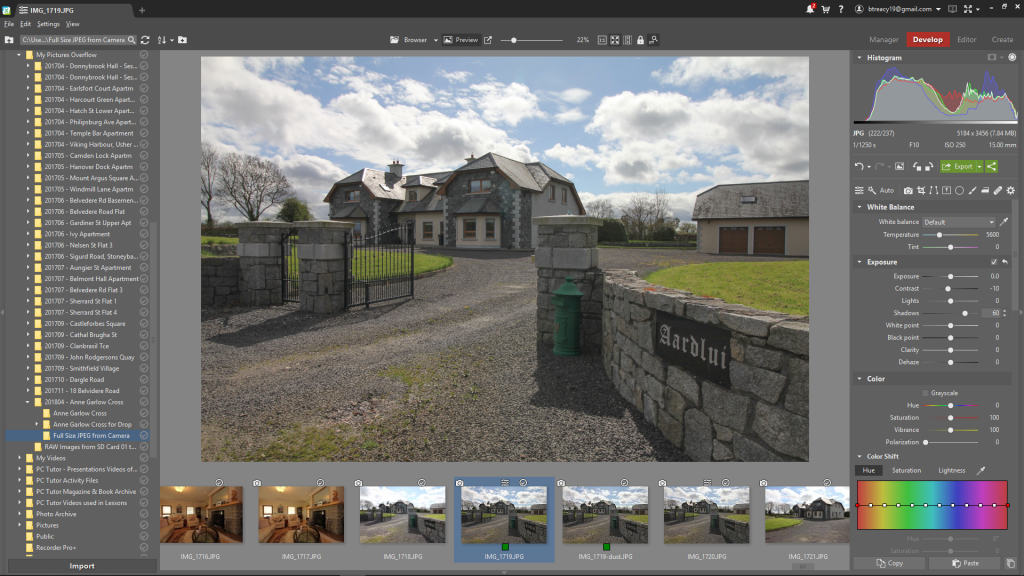
Figure: Photo of house before any adjustments made

When taking this photo, I used Aperture Priority program as I wanted to be able to set a small aperture for maximum depth of field so that the wall on the right would be sharp. To prevent the sky from becoming overexposed, I set the exposure bias to: -1 which has the effect of reducing exposure by -1 stop. Notice how the sky is properly exposed but the shadows are too dark.

The exposure adjustment settings for this photo are:

Lights: -25 – to recover slightly blown out sky
Shadows: 60 – to brighten up shadows
Contrast: -10 – to slightly lower contrast

Figure: After making exposure adjustments

As you can see above, the exposure and contrast is now more accurate. Its worth mentioning also, that these adjustments were made using a good quality monitor where the colours and contrast are fairly accurate.

Step 8 – Refinements – Colour adjustments and selective enhancements

One of the limitations of using a modern DSLR camera is that the sensor can be exposed to dust particles when the lens is changed. For cameras which have a fixed lens, like compact cameras, this is less likely to be a problem.

Figure: Photo of house with dust spots added to simulate the effect

Figure: Close-up of dust spots

As can be seen in the above Sensor Dust Spot simulation, as my camera is currently free of dust spots, the dust spots are quite noticeable and usually show up in bright areas of a photo like the sky.

To retouch the dust spots, select the Editor mode within Zoner as shown above. You will then be presented with a selection of editing tools. The Clone tool should be used to retouch dust spots like these. It can be accessed by first clicking on Retouching Tools icon and then clicking on Clone Stamp tool.

The diameter of the Clone tool has been set to 20 which is sufficiently small to clone from nearby area before applying to dust spot. To use the Clone Stamp, press CTRL key and click on area to be cloned, and then release CTRL key, move editing circle over dust spot, and then press Left Mouse button about 3 times

Note: The editor in Zoner Photo Studio might not be as advanced as Photoshop, but it is very capable of handling the editing required for everyday purposes.

Step 10 - Output Sharpening

The apparent sharpness of a photo depends a great deal on how much contrast there is along edges and lines. If a photo looks soft, it can often be improved by sharpening, a process (technically called unsharp masking) that adds contrast along lines and edges. Many photographers sharpen almost every photo except for photos such as fog scenes that are deliberately soft.

Note: If they are misused, sharpening and noise reduction can actually cause problems with your photos. However, if they are used with care, they are a great way to add polish to your photos.

Read more at…
http://www.cambridgeincolour.com/tutorials/photo-sharpening.htm

Photo Editing Demo – Bedroom

This demo covers the necessary steps to enhance a photo using the 10 Step Post Processing Workflow as outlined by www.cambridgeincolour.com.  You may not need to follow this procedure with all of your photos, but whenever you want to get that special photo looking just right, these steps can make all the difference.

Evaluating Photo

Before you carry out any editing, you have to first of all evaluate the photo to decide which steps you might need to apply.  The display on the camera is so small, captured photos are hard to evaluate properly.  So what do you look for when deciding if one of your photos can be improved?

The main areas to look at are :-

  1. The Tonal Range - range of tones in a photo between pure white and pure black.
  2. Colours - hue, saturation, and brightness can be adjusted.
  3. Flaws in Photo – Small imperfections can be retouched using Photo Editing Program.
  4. Sharpness of Photo – most photos can benefit from sharpening.
  5. Noise – can appear in low light conditions when using high ISO setting.

After evaluating a photo, you should then decide which steps of the Post Processing Workflow should be carried out as shown below.

10 Step Post Processing Workflow Photo of Bedroom
  1. White Balance - temperature and tint adjustment sliders
  1. Exposure - exposure compensation, highlight/shadow recovery
  1. Noise Reduction - during RAW development or using external software
  1. Lens Corrections - distortion, vignetting, chromatic aberrations
  1. Detail - capture sharpening and local contrast enhancement
  1. Contrast - black point, levels and curves tools
  1. Framing - straighten and crop
  1. Refinements - colour adjustments and selective enhancements
  1. Resizing - enlarge for a print or downsize for the web or email
  1. Output Sharpening - customized for your subject matter and print/screen size

Read more at...
http://www.cambridgeincolour.com/tutorials/digital-photo-editing-workflow.htm

Step 1 - Adjusting White Balance

Figure: Photo of bedroom lit by both incandescent lamp and daylight coming from small window to right of camera.

As you may notice in the above photo, the camera has not properly captured the correct white balance. This is because it was set to auto white balance mode, where on this occasion it didn’t get it right.

Note: Paradoxically, cameras typically make the biggest white balance mistakes with scenes that are the most dramatically lit (and often could have benefited the most). Pay extra attention to white balance when shooting sunsets, indoor lighting and low-light photos, etc.

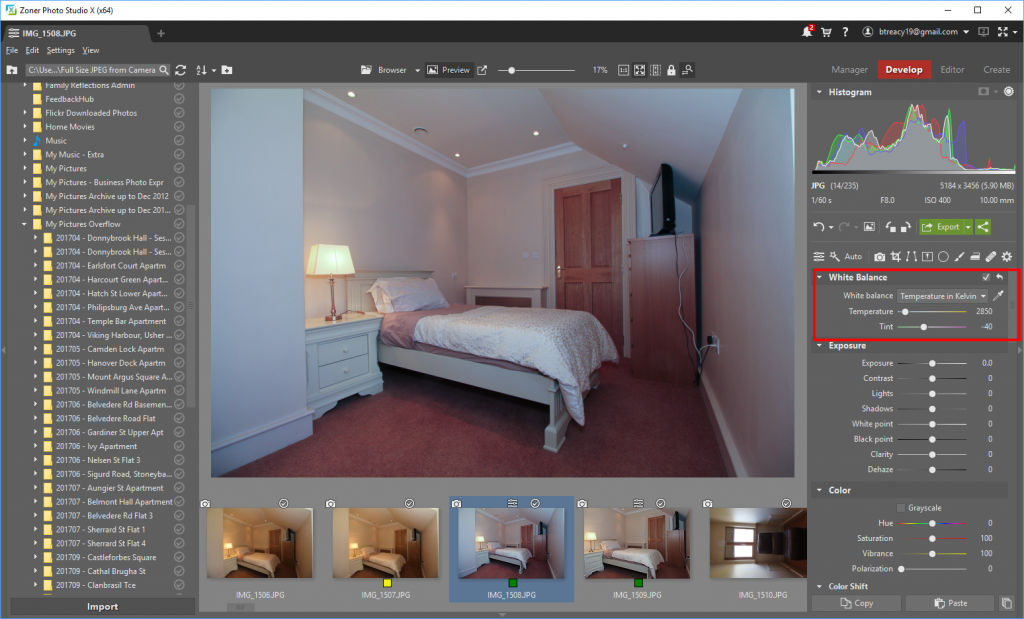
Within Zoner Photo Studio, it is possible to set the White Balance to ‘Incandescent’ which is a good first editing step as the bedroom is partially lit by the lamp.


Figure: Photo of bedroom after the white balance preset was changed to ‘incandescent’

Changing the White Balance preset is a slight improvement but the photo has also got a magenta tint. This can be removed by sliding the ‘Tint’ control to the left to add some green to cancel it out.

Figure: Photo of bedroom after Tint control set to –40

Notice now how the colours in the photo look more accurate.

In the above photo, it was fairly straightforward to adjust both the Temperature and Tint slider. With photos where its not so clear cut, it is usually easier to use the eyedropper tool near the white balance sliders.

To use it, all you do is click the eyedropper on a neutral colour and Zoner will automatically set the white balance for you. It is really easy. Here are the specific steps for using this powerful tool:

  1. Click on the eyedropper.
  2. Move to a neutral colour within your picture. I find that white works best, but gray and black work as well.
  3. Click on the neutral colour.
  4. If you don’t like how it looks, just find a different spot and click again.

When you click on a neutral colour, notice how the Temp and Tint sliders move as you use the eyedropper. You will find that much of the time Zoner (or other photo editing program like Lightroom) does a really good job of setting the white balance with this simple click.

Read more about using eyedropper tool at...
https://www.colesclassroom.com/understanding-white-balance/

Adjust Photo of bedroom with eyedropper


Figure: Photo of bedroom after the white balance has been set using the ‘eyedropper’ tool (highlighted in green).

When I used the ‘eyedropper’ tool on above photo, I clicked on the white pelmet but there are also other neutral areas of photo which could also be used, like pillow or duvet. It may also be necessary to go on to make finer adjustments using the Temperature and Tint sliders to get a more accurate White Balance result.

Step 3 - Noise Reduction

‘Photo noise’ is the digital equivalent of film grain for traditional cameras. For digital photos, this noise appears as random speckles on an otherwise smooth surface and can significantly degrade photo quality.

Although noise often detracts from a photo, it is sometimes desirable since it can add an old-fashioned, grainy look which is reminiscent of early film. Some noise can also increase the apparent sharpness of a photo. Noise increases with the sensitivity setting in the camera, length of the exposure, temperature and even varies amongst different camera models due to different sensor sizes.

Figure: Close-up of bedroom photo – noise reduction has been applied on the right

As this photo was taken at a high ISO i.e 400 and in low light conditions, some noise is visible on the photo as can be seen on the left. Within Zoner, I set the Noise Reduction - Brightness setting to 80% and as you can see on the right, the noise level is more acceptable without loss of detail.

Step 7 – Framing - straighten and crop

Cropping is one of the easiest adjustments you can do to a photo, while also having the biggest impact on improving the photo. In the photo below, you can see that the crop tool, from the right-hand tool palate, has been used to select the area of the photo to be cropped.

Figure: Photo of bedroom with area to be cropped already selected

Once you are satisfied that the photo will be improved if it is cropped as selected, press the Enter key, and the crop will be applied.

Figure: Photo of bedroom after it has been cropped

Note: When using the crop tool in Zoner Photo Studio, the aspect ratio of the original photo is maintained. In other programs, like The Gimp, it is necessary to specify the aspect ratio in tool options beforehand.

Step 10 - Output Sharpening

The apparent sharpness of a photo depends a great deal on how much contrast there is along edges and lines. If a photo looks soft, it can often be improved by sharpening, a process (technically called unsharp masking) that adds contrast along lines and edges. Many photographers sharpen almost every photo except for photos such as fog scenes that are deliberately soft.

Note: If they are misused, sharpening and noise reduction can actually cause problems with your photos. However, if they are used with care, they are a great way to add polish to your photos.

Read more at…
http://www.cambridgeincolour.com/tutorials/photo-sharpening.htm

Manage your Tasks with Toodledo

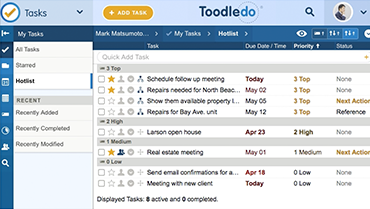
In this section we will introduce a well featured To-Do List called Toodledo which is recommended by personal productivity website www.mindtools.com in an article on how to use to-do lists.

Task management is important for the simple reason that personal success seems to be the result of knowing what you want to do then directing action towards it. So, without a clear list of prioritised tasks, there can be no directed action.

Actively managed tasks lists also create a certain degree of accountability in ourselves. It very clearly indicates where we have fallen short of in terms of directed action, and is a good (if somewhat pressure-free) wakeup call to get more done.

Toodledo Features covered in this Lesson

Add a single task using Quick Add or by clicking on Add Task button.

Add multiple tasks from a list.

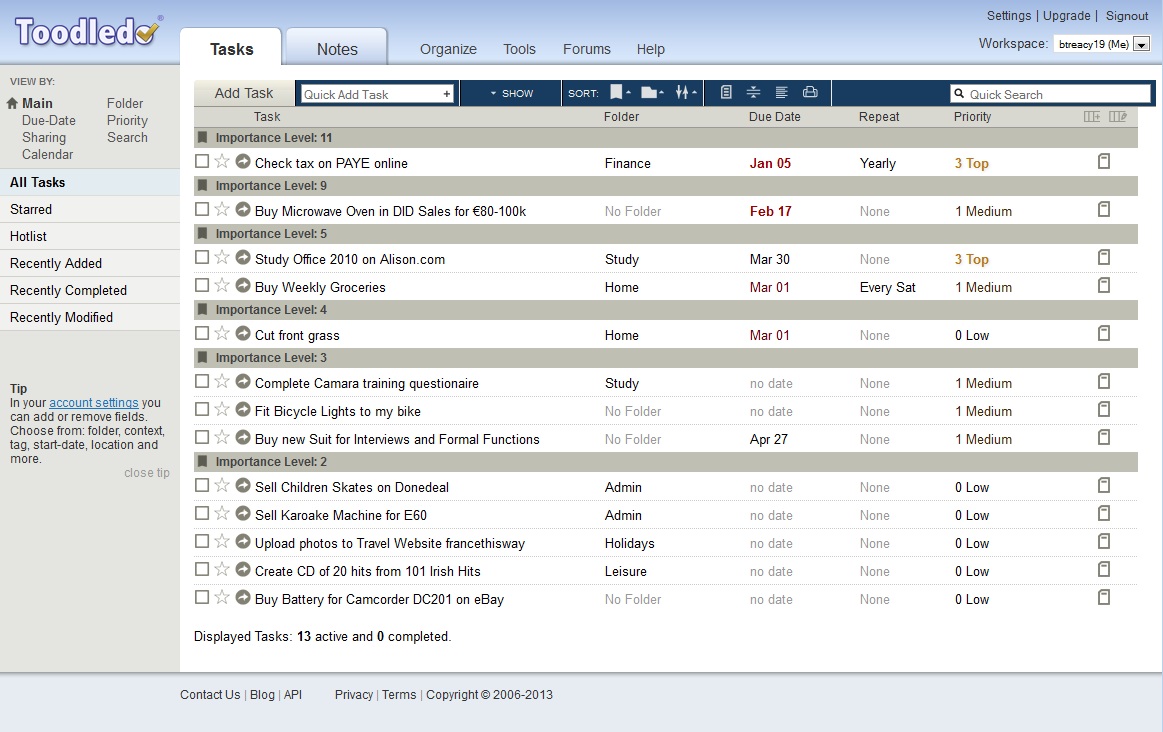
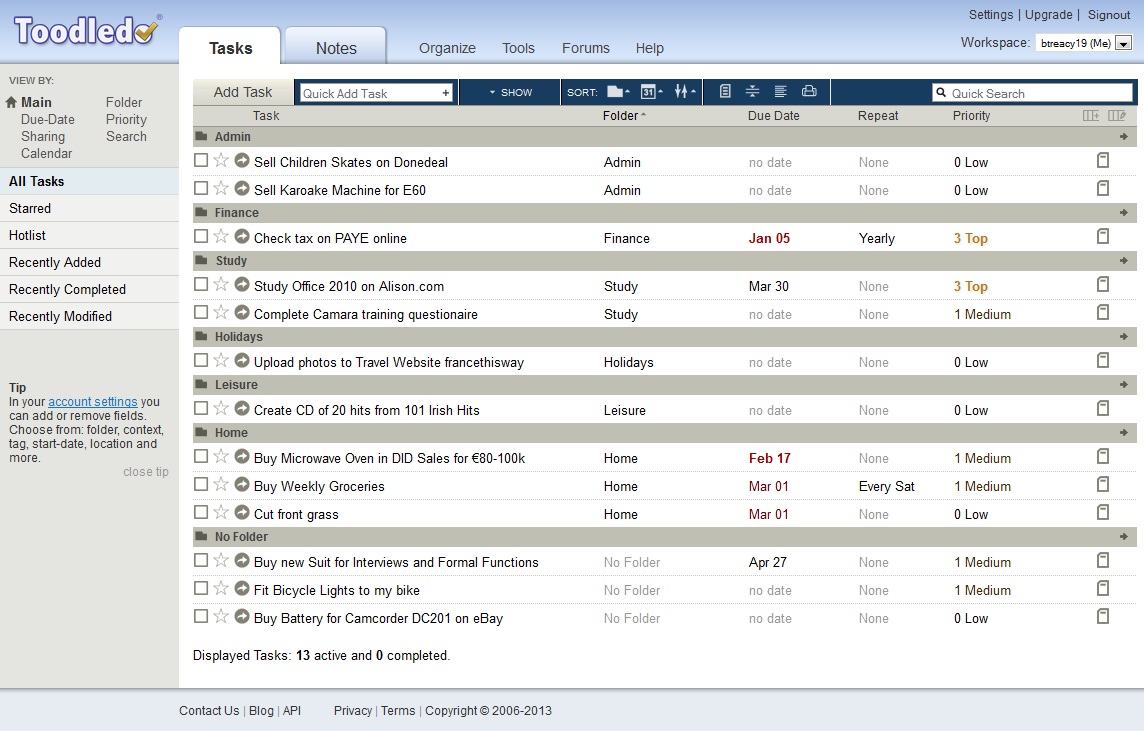
Sorting Tasks into best order to identify tasks to be done next.

e.g Sort by Importance/Folder or Sort by Folder/Due Date

Toodledo - Tasks in Importance Order.jpg

Toodledo - Tasks in Folder Order.jpg

Rollover tasks

These are tasks which are carried over from yesterday to today. There are three methods for dealing with these.

  1. Leave the task as overdue as this is important information to know or remove due date as a due date is only for tasks that are absolutely due on a particular day. If the task does not have a hard due-date then it might be better to omit it and give it high priority so you can make time to complete it.
  2. Use optional repeating as an optional task will automatically get moved to the next occurrence if the due-date passes.
  3. Use the Multi-Edit feature to quickly change the due date on a group of overdue tasks.
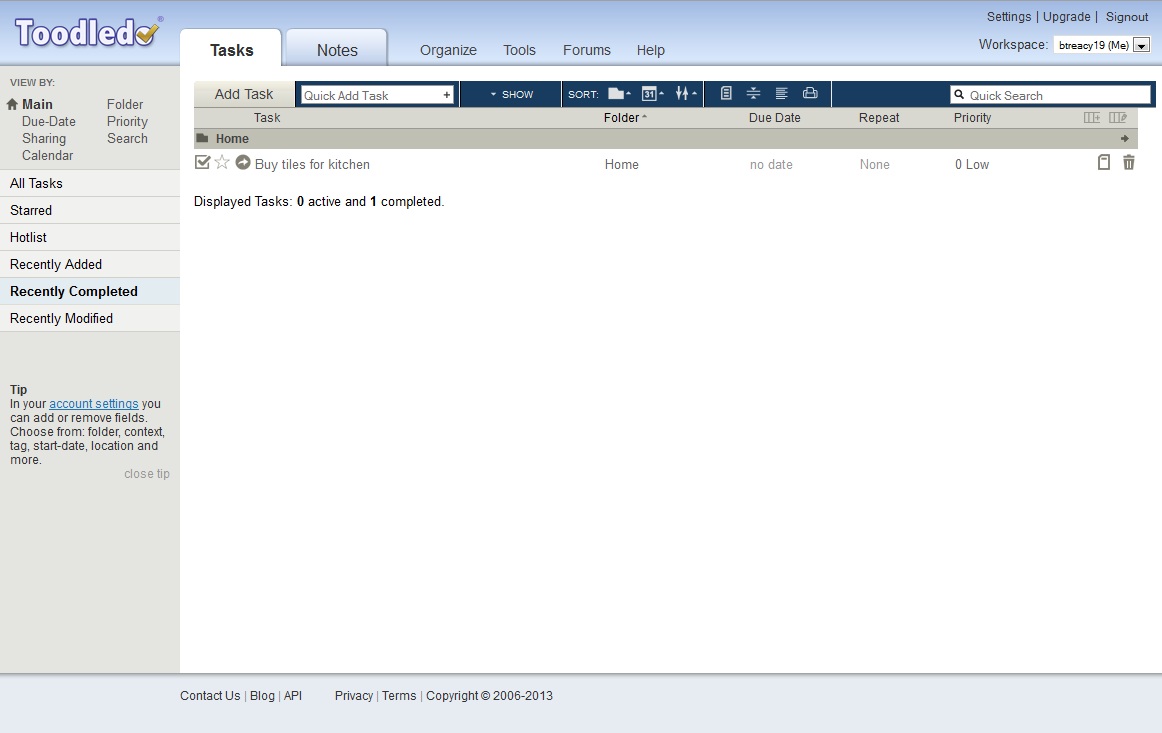
  4. View Recently Completed Tasks :-

Toodledo - Recently Completed.jpg

From the Main View, Click on Recently Completed

Delete a Task

Go to Recently Completed tab and click on trash icon or

Click the action icon  to cause popup menu below to appear and click the ‘Delete Task’ link.

When task deleted then check ‘Recently Delete Tasks’ in account settings to see tasks that have been deleted.

Using Toodledo with GTD Productivity Method

Click on this link - http://www.toodledo.com/info/gtd.php

Activity - Input, Organise and Prioritise Sample Tasks List

In this Activity, we will Input, Organise and Prioritise a set of sample tasks together as a class so that we will all be seeing the same result as we progress.

Open up the document Toodledo Sample Tasks in PC Tutor Activity Files

Select all tasks and copy using edit/copy option or ctrl + c

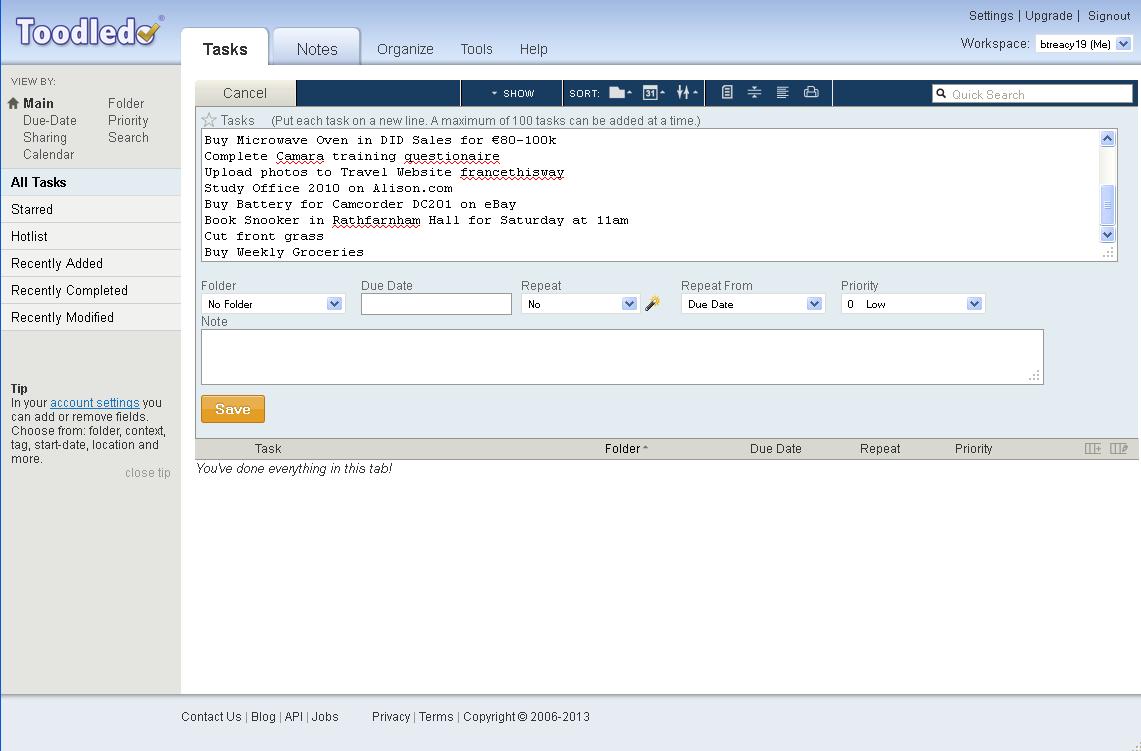
Add tasks to Toodledo using the Add Multiple Tasks option as shown below…

Toodledo - Add Multiple Tasks.JPG

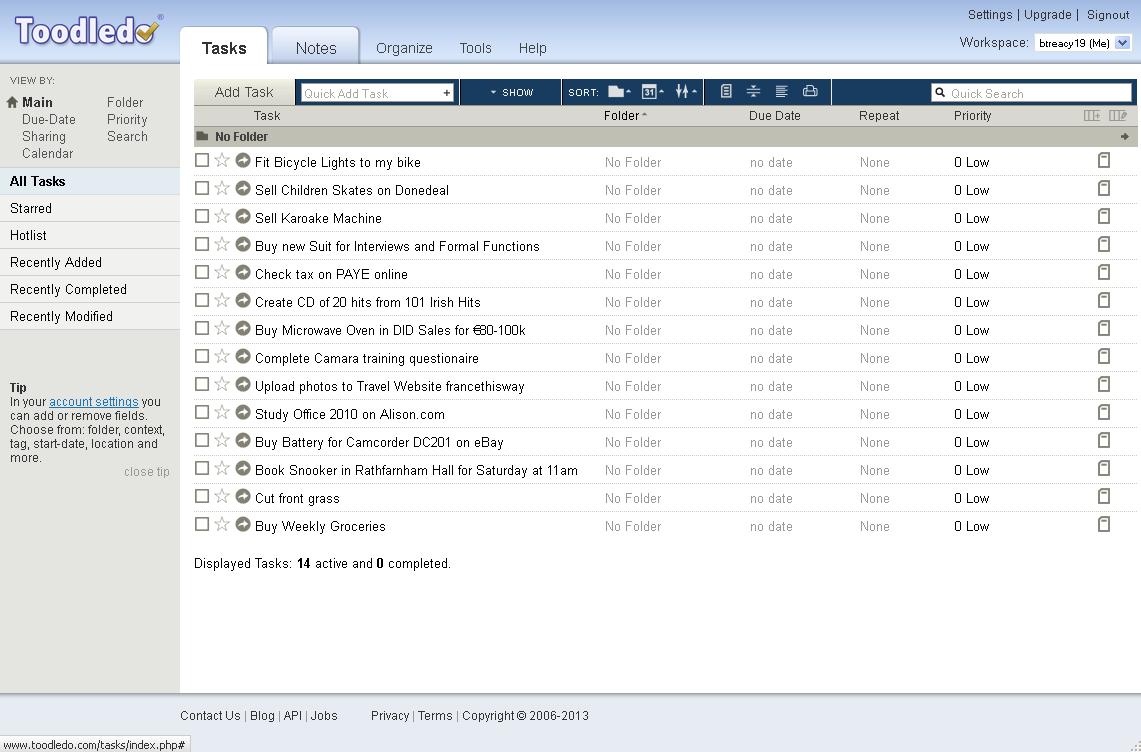
Save the tasks above and the screen below will be displayed with all task listed in their basic form.

Toodledo - Tasks added multiply.JPG

  1. Add the following Folders by selecting the Organise/Folders option from main menu :-
  • Admin
  • Finance
  • Shopping
  • Study
  • Holidays
  • Home
  • Leisure
  • Misc
  • Work

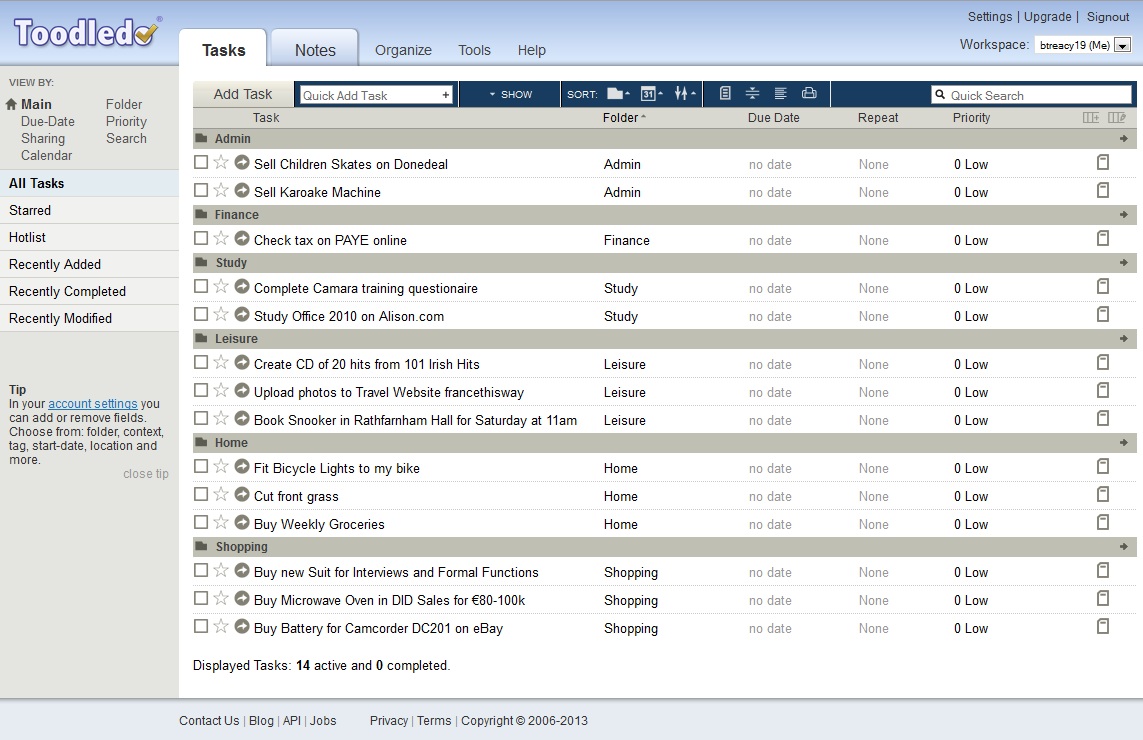
Categorise all the tasks into the most appropriate folder and then Sort by Folder
Toodledo - Folder Order for Activity 2.jpg

Now that the tasks have been added to Folders, the next step is to set the Due Date, Repeat and Priority where necessary.

So for task Check Tax on PAYE Online, Set Due Date to January 1st, Repeat Yearly and High Priority

Review all other tasks and decide which ones should have a Due Date, Repeat and Priority set.

--- End of Activity ---

Activity - Import Tasks List.

In this activity we will import a Task List which could have come from some other task manager which exports in the iCal format.

In the shared folder Calendar Tasks and Notes - download the file toodledo sample tasks.ics by right clicking on the file name and selecting the download option.

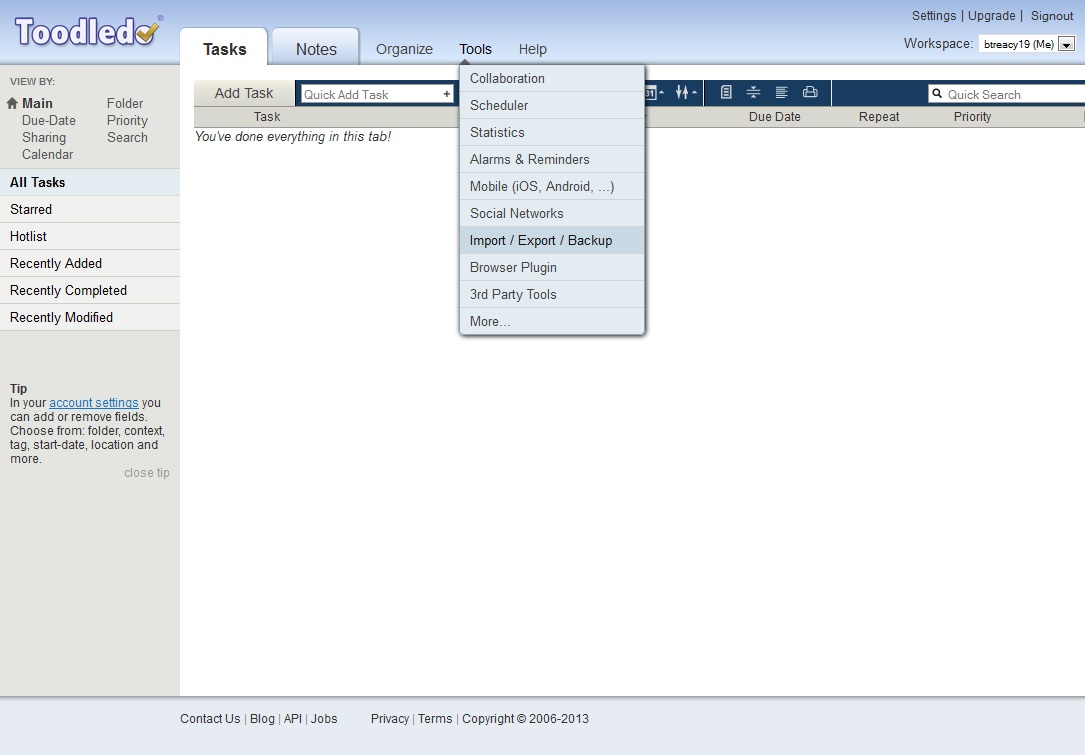
In Toodledo, select option Tools/Import/Export/Backup as shown below.

Toodledo - select Import Option.jpg

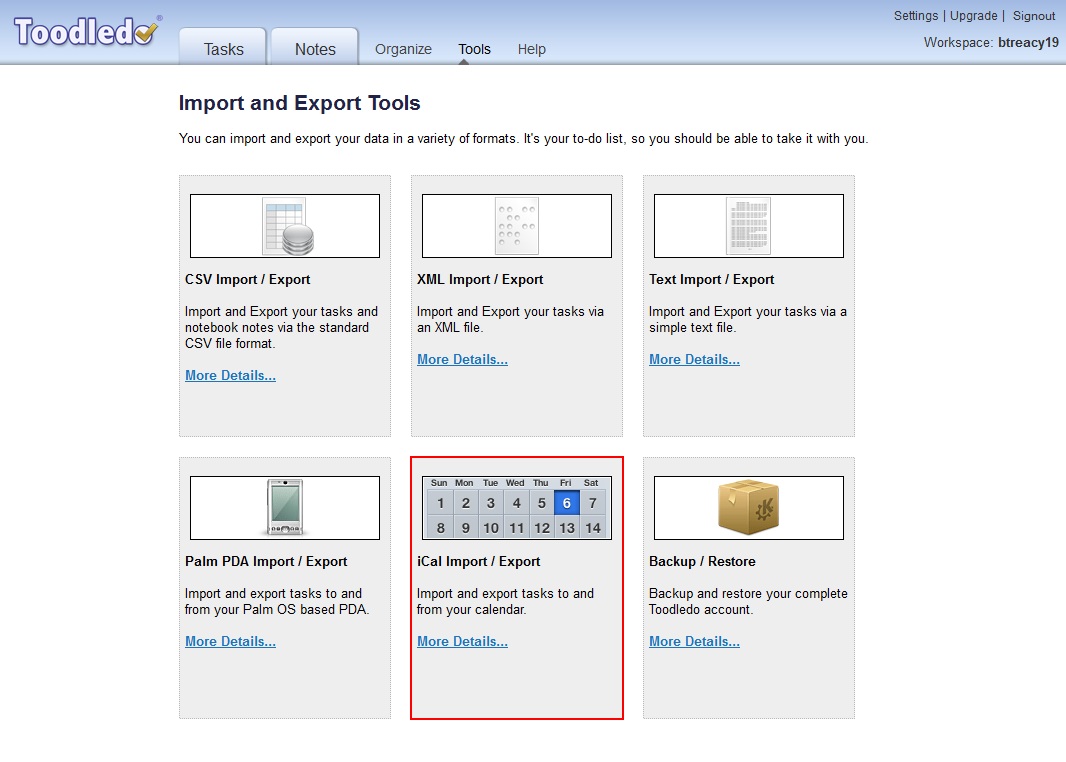
You will be presented with the following screen…click on More Details in the highlighted iCal Import / Export tool

Toodledo - Import Option Highlighted.jpg

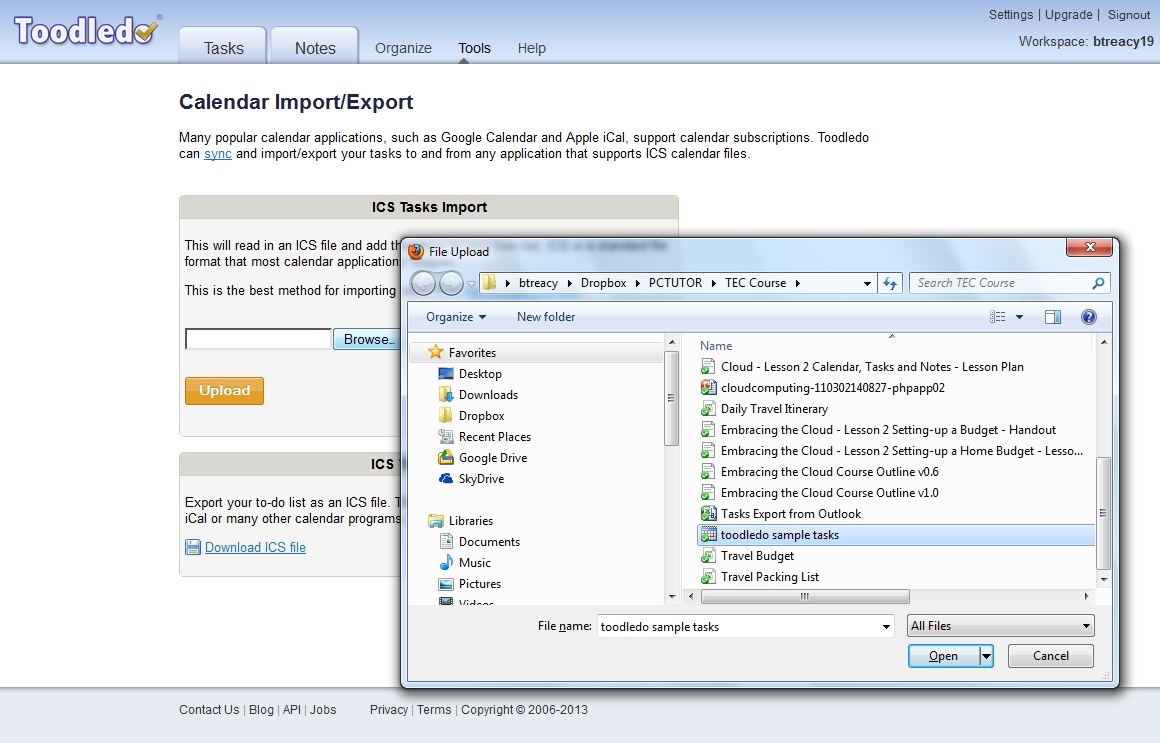
Select toodledo sample tasks file to be imported…

Toodledo - Browse for Import File.jpg

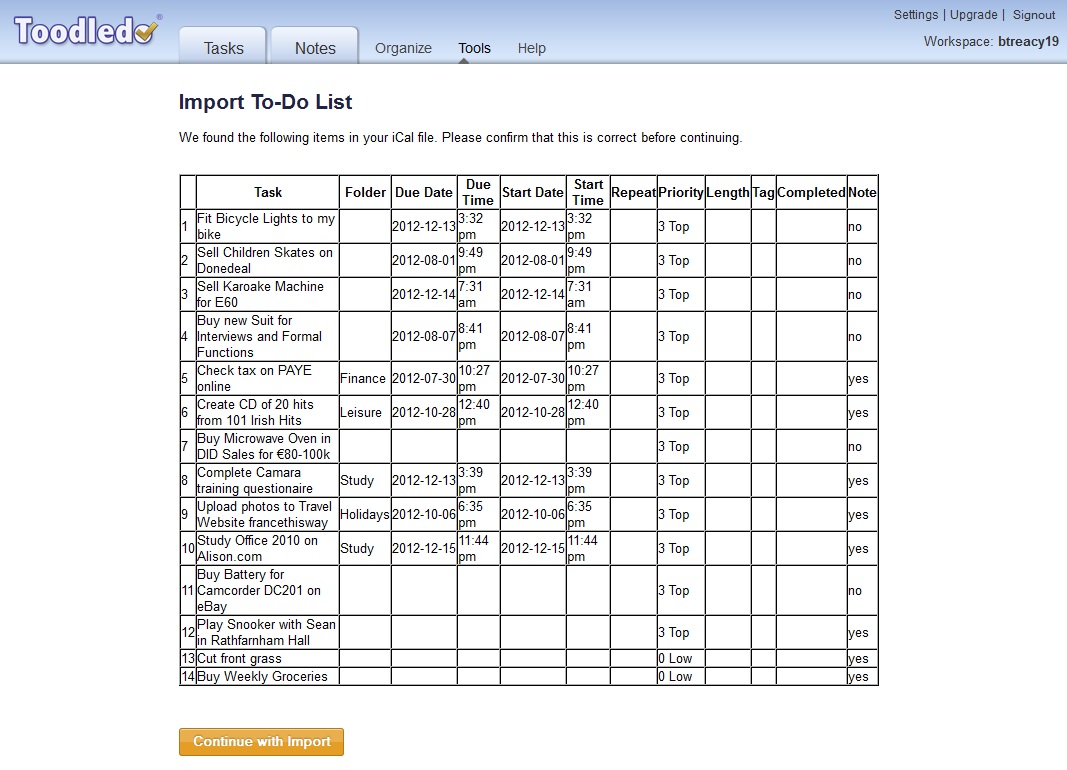
You will be presented with the following screen (or similar).

Toodledo - Continue with Import.jpg

Click on  and tasks will be imported and can then be Categorised and Prioritised as required.

--- End of Activity ---

Related Tutorials

Managing Your Schedule with Google Calendar

Many people have a difficult time with time management skills, but there are quick and easy ways that you can help yourself to schedule and manage your time in a more effective manner. One great idea that works well for many people is entering a weekly schedule of events into a calendar.

One of the most important tools in managing your day to day schedule is to use an online calendar. Google Calendar is a very popular one as you can access it from any web enabled device and you can also sync your appointments with a tablet or smartphone.

What should you put on your calendar?

The following items are ideal for including on a calendar so that someone has greater control over events occurring in their everyday lives :-

  • Appointments (dentist, classes, dinner with friends, meetings, etc).
  • Deadlines (handing in report, filing taxes, etc).
  • Events (pay day, birthdays, holidays etc).
  • Time sensitive errands (buying something in a sale before closing time).
  • Focus time like Study of a Course (when no one can disturb you).

Entering items above on your calendar will help to keep you more organised as well as hold you accountable for your time. Only definite items which you want to schedule for the days and weeks ahead should be added to your calendar. So you will then have a sense of commitment to carry them out at the specified time.

Tasks with a due date are probably better kept in Task Management software like Toodledo or Taskcoach rather than on a calendar where they can be marked as completed as they are worked on. So for a particular project like – ‘Redecorate the Living Room’, it can be entered in calendar as a block of time, but the individual tasks that need to be done are better listed in a Task Management app.

Google Calendar main Features

The key features of Google Calendar, that are presented below, are the features that most new users would be interested in using. They have been selected from the Google Calendar Help section.

Screenshot 1 – Select Week View

Calendar views

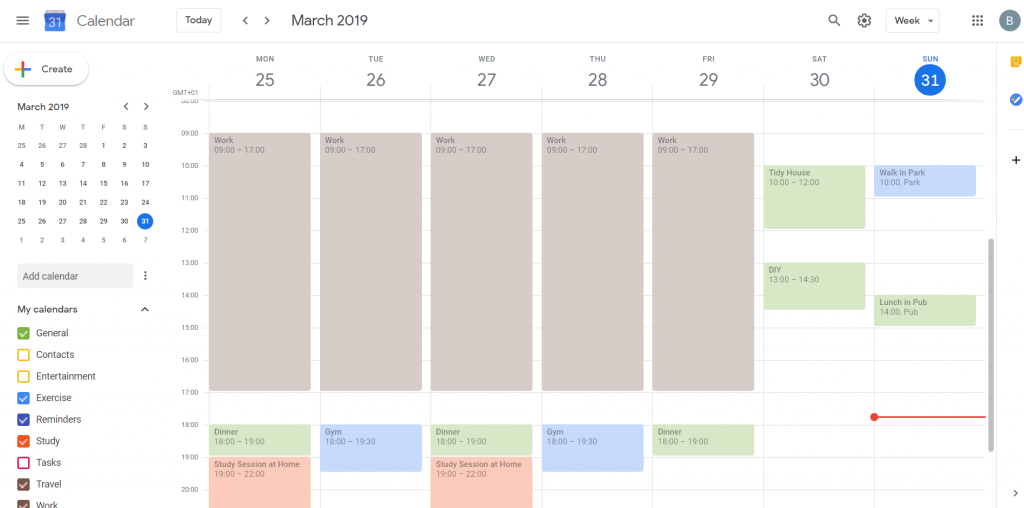
As you can see on Screenshot 1 above, the Week View is about to be selected from Calendar View options (in top right position of main calendar screen) which results in the Week View being displayed as shown in Screenshot 2 below. Notice also the other Calendar Views available like the Schedule View shown in Screenshot 3 below.

Screenshot 2 – Week View

Screenshot 3 – Schedule View - also an option from Calendar View options

Create an Event

Here is a list of 3 ways of Creating an Event or Reminder:

  1. Click on an empty timeslot on your calendar
  2. Click the Create button
  3. Use keyboard shortcut: Shift C

Click on this link for further details: Google Calendar Help for Creating an Event

The most common method is to click a timeslot on your calendar as shown below:

Screenshot 4 – Timeslot for Friday at 21:30 was clicked while in Week View

If you decide shortly afterwards that you need to edit the event that you just created, click on the event to display the pop-up window and then click on the Edit icon as shown on screenshot 5.

Screenshot 5 – Click on Edit Event icon

When I created this Calendar Event, I also entered the Event Location on the Title line as it saved having to add it later as shown below. But the downside of this quick approach is that the Event Location would not be available to use within Google Maps on a mobile phone to navigate to your destination.

Screenshot 6a – Edit Event screen showing Event Location and Calendar setting

So the best approach is to insert the Event Location including post code into the Location box (Note: Full address can be selected from search results when Event Location is input as shown in Screenshot 6b).

Screenshot 6b – Search results displayed when entering Event Location

As well as entering the Event Location, I also changed the Calendar for the event to ‘Entertainment’, so that it was more suitable for this type of event.

To create recurring èvents, see article: Google Calendar Help – Create Recurring Event

Creating Calendars for Family, Business, Leisure, Exercise etc

Screenshot 8: Select ‘Create new calendar’ option as shown above

Screenshot 9: Enter Calendar name and then click ‘Create calendar’ button

To edit the calendar, select ‘settings and sharing’ option as shown in screenshot 10 below.

Screenshot 10: Selecting ‘Settings and sharing’ option on main calendar screen

The screen below is displayed when ‘Settings and sharing’ option above is selected.

Screenshot 11: Settings on the left side of screen can be viewed and changed

Calendar Sharing

Here are the main ways you can share your calendar with family, friends, and co-workers.

  1. Share your main calendar with someone so they can see your schedule.
  2. Create a calendar that multiple people can edit, like a family calendar.
  3. Add someone as a delegate of your calendar to schedule and edit events.

This article only covers option 1 above.

Navigate to Screenshot 11 as shown above, and click on Share with specific people

Screenshot 12: Share with specific people has been selected from side options

To share with individuals: Under ‘Share with specific people’, add the email address of the person you want to share with by clicking + Add people.

Screenshot 12a: Select sharing permissions

Permissions Settings should be set depending how well you know the person you are sharing your calendar with. So if you are sharing with a work colleague you may set it to ‘See only free/busy’ while if they are a friend you may set it to ‘See all event details’

Related Tutorials

Task Management Basics

To-do lists are essential to good time-management practice. They provide a guideline for what items are to be completed within a given amount of time. You may want to create a list weekly or daily. Either way, to-do lists help you remember what you need to do.

Completing a list each day can help you see how much you have got done. Place a mark next to high-priority items so you know at a glance what you should devote your time to first.

Prioritise Tasks

In order to prioritise tasks, you have to clearly set a Priority Category for each one. For example, how do you categorise something you have to do today to make it stand out from something that must be done by next week? The first step is to come up with categories to help you decide what tasks should be done first. Your categories might look something like this:

  1. Absolutely Urgent: These must be done right away or by a deadline and are important to your job, your family, or to you personally.
  2. Urgent: These are important to you, your family, or your job, but don’t have a deadline.
  3. Chores: These are things you don’t necessarily want to do but have to do anyway.
  4. Maybe: These are things you would like to do, but they aren’t especially important and it doesn’t matter if you do them today, tomorrow, or next week.
  5. Dreams, Wishes, and Ideas: These are things you might like to do but have no immediate importance in your life.

Using categories such as these may be confusing at first, but, as you continue to work with them, you will start automatically assigning categories as soon as you receive a task. Once you do that, you can figure out when something should be done and whether you need to give immediate attention to it or whether it can wait.

Just as important as categorising your tasks, is finding a way for you to manage the list. Task lists are ever changing and evolving. New tasks are added, some tasks are completed and others are no longer important for now.

Time management is all about focus and consistency. Put these basic skills into practice every day and you will see that managing your time will get easier and easier.

What to Look for in a Task Management App

Here are a few features to look for in a good to-do list:

  • You have to like the way it looks as it is easier to get stuff done if you like the look and how well-designed it is.
  • A to-do app should give you a range of tools for organising your tasks e.g separate work tasks from personal tasks using categories or view those due by a certain deadline and which ones are overdue.
  • You should be able to rearrange the order of tasks quickly and easily and schedule reminders so that a notification is displayed shortly before you need to do task.
  • It can be useful to have the option to make lists collaborative – e.g if you run a household, you would like to be able to assign tasks to other people and perhaps the same people might want to assign tasks to you too – in a democratic household that is!
  • It should include offline functionality and an export feature so you can switch over to another app if you decide to.

Why Use a To-Do List App Instead of a Notebook?

  • To-do apps have built-in reminders which ensure a task is done on time.
  • Digital lists are easier to edit than paper ones, so you can adjust your priorities and clarify your tasks as needed.
  • You can't lose a digital list that's saved to the cloud. If you're not a naturally organized person, this may be a key benefit.
  • Different views in a to-do app let you see only tasks that are relevant at the moment.
  • To-do list apps can be collaborative so you can assign tasks to other people and get notified when they complete them.
  • You can choose a to-do list app with features that motivate you, whether it's a beautiful design or is available on all devices like desttop, tablet and smartphone.

Task Management Apps

There is an enormous number of to-do list apps. You could spend days’ exploring all the task management apps that show up in an internet search.

Here are some of the most popular:

Todoist
Available on many platforms. Clean, simple interface. Neat productivity charts with Premium account. Good task classification tools. Collaboration supported. Location-based reminders. Offline functionality.

Any.do
Unique daily review feature. Location-based reminders and collaboration features. Decent sharing capabilities for free members. Any.do is a useful and well-designed to-do app, though the free version is a bit limited. Its standout feature is the Any.do Moment, which encourages you to review your daily task list before committing to it.

Asana
Flexible, fast, and modern design. Capable free version. Feature-rich. New Timeline view makes it easier to manage dependencies. Although it may be confusing at first, its flexibility and vast capabilities are well worth the initial effort it takes to get started.

Toodledo
Strong feature set. Includes some features for GTD followers. Treats notes, habits, lists, and outlines as separate from tasks. Toodledo has a long list of features but it takes a while to get the app to work the way you want.

A few other apps that are great in certain circumstances are Google Tasks (for integrating with G Suite apps), Microsoft To-Do (if you use Microsoft Office or Windows 10), and Omnifocus (for those who add a lot of detail to their tasks).

There are so many others, however. If none of these strike your fancy, ask your friends (particularly your organized ones) what they use. Try a few and pick one you like and that backs up your information to the cloud so you never lose anything.

Activity - Organise and Prioritise Sample Tasks in Toodledo

In this Activity, you will import a file of sample tasks into Toodledo and then go on to organise and prioritise them according to the instructions below.

  1. Create a free account in Toodledo at: www.toodledo.com
  2. Download the file Toodledo Sample Tasks.csv from the following folder into your Windows documents folder or downloads folder…

PC Tutor Activity Files

In Toodledo, select the import / export / backup option from the Account menu and import the above file by following the instructions.

  1. Add the following Folders by selecting the Organise/Folders option from Account menu :-
    Admin
    Finance
    Shopping
    Study
    Holidays
    Home
    Leisure
    Misc
    Work
  1. Categorise all the tasks into the most appropriate folder and then change sort order to Folder/Due Date/Alphabetical
  2. Now that the tasks have been added to Folders, the next step is to set the Due Date, Repeat and Priority where necessary.

So for task Check Tax on PAYE Online, set Due Date to January 1st, Repeat Yearly and High Priority

Review all other tasks and decide which ones should have a Due Date, Repeat and Priority set.

--- End of Activity ---


Related Tutorials

Financial Comparison and Government Websites – Ireland

Comparison Websites

If you type “price comparison website” into any search engine and you will be presented with scores of sites promising to save you money on everything from your broadband and phone to travel insurance. While many of the sites are automated and just trawl other websites to collate pricing information in real time for people too busy to do the research themselves, there are also a growing number of personalised services which use real interaction to find people better value for money.

The first area where money can be saved is utility bills. A couple of years back, hundreds of thousands of Irish people cleverly made the Big Switch and moved from ESB to Bord Gáis Energy (both previously Irish state owned), which was promising to undercut the one-time monopoly by as much as 20 per cent. People made the change and then thought the job was done and they would be able to avail of the savings for ever, but after the year-one discounts were gone, the providers quickly switch consumers back to the higher rate – so what people need to do is shop around all the time.

Activities – Comparison Websites

Compare broadband offers in your local area

Compare broadband offers in your local area by using accredited websites below, and decide on which option offers lowest price and unlimited download capacity.

www.bonkers.ie

www.switcher.ie

Compare Mortgages to Find a Lower Interest Rate

Compare mortgages at the CCPC website below and decide if you are a first time buyer or if you are a likely mortgage switcher.

www.ccpc.ie/consumers/financial-comparisons/mortgage-comparisons/

Government Services - Ireland

MyGovID

www.mygovid.ie gives Irish citizens a secure “single sign on” to their public services. It is built on the Public Services Card, linking a ‘real word’ identity to an online identity. It can already be used to access Revenue’s ‘myAccount’ services and ‘MyWelfare.ie’ online services from the Department of Social Protection.

MyGovId provides users with a safe secure online identity for Irish government services. A MyGovId account will act as a secure “single sign on” identity for multiple online government services across a variety of government and public sector organisations.

Users can already access a range of social welfare services and Revenue’s “MyAccount” service using a MyGovID account. Eventually, all government online services will migrate to the secure MyGovID platform.

See more in press release from 23rd March 2017:

www.per.gov.ie/ga/government-launches-mygovid-a-safe-secure-online-identity-for-government-services-in-ireland/

Besides the www.mygovid.ie website mentioned above, here is a list of the main Irish government websites:

Irish Government Information Portal

www.gov.ie/en

myAccount enables you to access PAYE services (including Jobs and Pensions), Local Property Tax, Home Renovation Incentive and many more services using a single login and password. You can also update your personal details, review your tax affairs, make payments and apply for certain tax reliefs and incentives.

www.ros.ie/myaccount-web/home.html

MyWelfare website can be used for a variety of services including application services, jobseeker's services, request payment statements and booking appointments for allocation of Personal Public Service Numbers and Public Services Cards.

www.mywelfare.ie

MABS is the Irish State’s money advice service, guiding people through dealing with problem debt for more than twenty years.

www.mabs.ie

And finally, here is a website that needs no introduction…

www.revenue.ie

Activities – Government Services

Calculate Income Tax Payable

Calculate your income tax payable by referring to revenue website to find out tax credits and standard rate cut-off point, and then checking it corresponds with amount deducted each week/month from your wages/salary.

See the following websites for guidance…
www.citizensinformation.ie/en/reference/case_studies/case_study_calculating_your_income_tax_case_studies.html
www.revenue.ie/en/tax/index.html