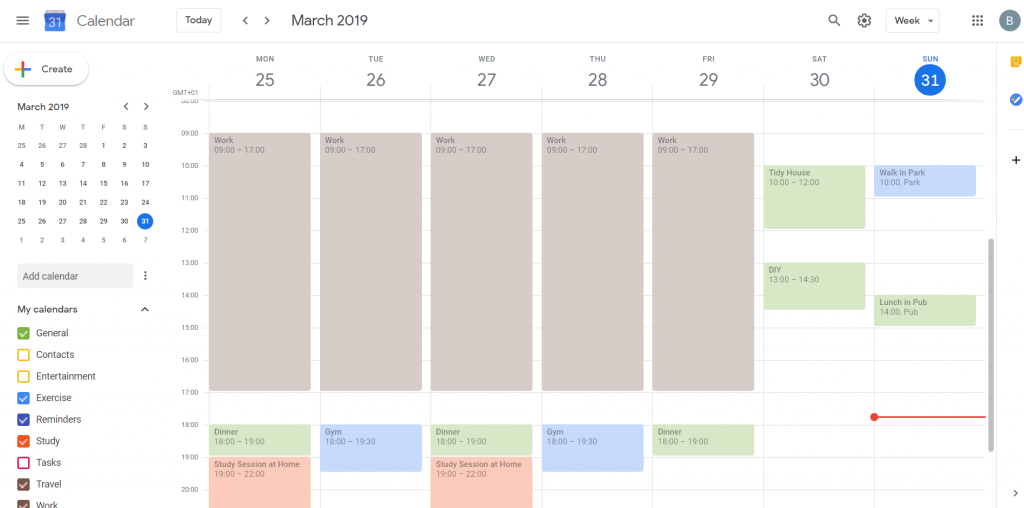
Many people have a difficult time with time management skills, but there are quick and easy ways that you can help yourself to schedule and manage your time in a more effective manner. One great idea that works well for many people is entering a weekly schedule of events into a calendar.
One of the most important tools in managing your day to day schedule is to use an online calendar. Google Calendar is a very popular one as you can access it from any web enabled device and you can also sync your appointments with a tablet or smartphone.
What should you put on your calendar?
The following items are ideal for including on a calendar so that someone has greater control over events occurring in their everyday lives :-
- Appointments (dentist, classes, dinner with friends, meetings, etc).
- Deadlines (handing in report, filing taxes, etc).
- Events (pay day, birthdays, holidays etc).
- Time sensitive errands (buying something in a sale before closing time).
- Focus time like Study of a Course (when no one can disturb you).
Entering items above on your calendar will help to keep you more organised as well as hold you accountable for your time. Only definite items which you want to schedule for the days and weeks ahead should be added to your calendar. So you will then have a sense of commitment to carry them out at the specified time.
Tasks with a due date are probably better kept in Task Management software like Toodledo or Taskcoach rather than on a calendar where they can be marked as completed as they are worked on. So for a particular project like – ‘Redecorate the Living Room’, it can be entered in calendar as a block of time, but the individual tasks that need to be done are better listed in a Task Management app.
Google Calendar main Features
The key features of Google Calendar, that are presented below, are the features that most new users would be interested in using. They have been selected from the Google Calendar Help section.
Screenshot 1 – Select Week View
Calendar views
As you can see on Screenshot 1 above, the Week View is about to be selected from Calendar View options (in top right position of main calendar screen) which results in the Week View being displayed as shown in Screenshot 2 below. Notice also the other Calendar Views available like the Schedule View shown in Screenshot 3 below.

Screenshot 2 – Week View

Screenshot 3 – Schedule View - also an option from Calendar View options
Create an Event
Here is a list of 3 ways of Creating an Event or Reminder:
- Click on an empty timeslot on your calendar
- Click the Create button
- Use keyboard shortcut: Shift C
Click on this link for further details: Google Calendar Help for Creating an Event
The most common method is to click a timeslot on your calendar as shown below:

Screenshot 4 – Timeslot for Friday at 21:30 was clicked while in Week View
If you decide shortly afterwards that you need to edit the event that you just created, click on the event to display the pop-up window and then click on the Edit icon as shown on screenshot 5.

Screenshot 5 – Click on Edit Event icon
When I created this Calendar Event, I also entered the Event Location on the Title line as it saved having to add it later as shown below. But the downside of this quick approach is that the Event Location would not be available to use within Google Maps on a mobile phone to navigate to your destination.

Screenshot 6a – Edit Event screen showing Event Location and Calendar setting
So the best approach is to insert the Event Location including post code into the Location box (Note: Full address can be selected from search results when Event Location is input as shown in Screenshot 6b).

Screenshot 6b – Search results displayed when entering Event Location
As well as entering the Event Location, I also changed the Calendar for the event to ‘Entertainment’, so that it was more suitable for this type of event.
To create recurring èvents, see article: Google Calendar Help – Create Recurring Event
Creating Calendars for Family, Business, Leisure, Exercise etc

Screenshot 8: Select ‘Create new calendar’ option as shown above

Screenshot 9: Enter Calendar name and then click ‘Create calendar’ button
To edit the calendar, select ‘settings and sharing’ option as shown in screenshot 10 below.

Screenshot 10: Selecting ‘Settings and sharing’ option on main calendar screen
The screen below is displayed when ‘Settings and sharing’ option above is selected.

Screenshot 11: Settings on the left side of screen can be viewed and changed
Calendar Sharing
Here are the main ways you can share your calendar with family, friends, and co-workers.
- Share your main calendar with someone so they can see your schedule.
- Create a calendar that multiple people can edit, like a family calendar.
- Add someone as a delegate of your calendar to schedule and edit events.
This article only covers option 1 above.
Navigate to Screenshot 11 as shown above, and click on Share with specific people

Screenshot 12: Share with specific people has been selected from side options
To share with individuals: Under ‘Share with specific people’, add the email address of the person you want to share with by clicking + Add people.

Screenshot 12a: Select sharing permissions
Permissions Settings should be set depending how well you know the person you are sharing your calendar with. So if you are sharing with a work colleague you may set it to ‘See only free/busy’ while if they are a friend you may set it to ‘See all event details’

